


Лазерные атмосферные системы связи
Оборудование для БПЛА
Беспилотные летательные аппараты
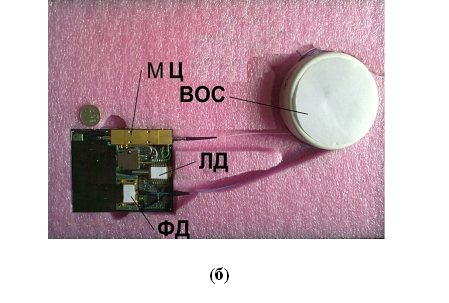
Оптоэлектронный генератор.
Новороссия
оптоэлектронный генератор ОЭГ СВЧ
Патенты2
шлемы
машина времени
БПЛА X5

БПЛА X5
The Z UAS is an electric powered flying wing that is flown autonomously through it’s own onboard autopilot system. An Inertial Measurement Unit (IMU) provides stabilization for the aircraft. GPS navigation is used to guide the aircraft to it’s destination. The UAV is landed autonomously via point and click on the included Ground Control Software. Optionally you may land the UAV with the included RC controller for those with experience flying RC airplanes.
Point and click flight planning in real time with the included ground control software. Flight patterns can either be pre-programmed on the plane before takeoff, or programmed in the air. Flight logging data can be downloaded to your PC. View live video in real time, and manipulate the camera gimbal itself to see what you want without having to changing course by using the included joystick controller. Take still color images or multispectral images using the same included software automatically by highligting the point of interest via a standard Google Earth file (downloaded directly from Google Earth). Once the area of interest is highlighted, the UAV automatically calculates the best route to fly in order to capture the necessary images for photo processing and with the perfect amount of overlap. The software even compensates for any added wind before executing the flight route, and ensures easy programming at any desired altitude.
marcusuav.com/zephyruav/
readymaderc.com/store/www.ritewingrc.com
|
 |
||||||||||
| with Tetracam Micro | |
||||||||||
|
with Ricoh PX Specifications
Camera
|
|
||||||||||
| with Retractable Gimbal |  |
||||||||||
| mage stiching software (compatible with the Zephyr2 platform -Richoh PX Gyro-Stabilized Payload) used to create orthomaps (geo referenced), DEM’s (digital elevation models), and landmark volume computations is offered by Marcus UAV. An all-in-one software called ‘Agrisoft Photoscan Pro’ provides the solution. Free traning is provided with purchase that explains how image processing is done. More information in regards to Agrisoft’s software can be found at the following link: http://www.agisoft.ru/products/photoscan/professional/. |  |
||||||||||
|
SMALL UAV AUTONOMOUS FLIGHT  |
Demonstration
Hi, in this video, I’m going to give a very brief overview of Pix 4d mapper that can be using in conjunction with our separate UAV products starting with geo-tagged images—however non-geo-tagged images can still be processed with this software as well. Geo-tagging images is possible through our included ground station control software by matching flight log data with photo image data. It can also be done using PIX 4D alone in the same manner of tagging images with flight log data. For this video, I am going to start with already geo-tagged images to demonstrate how easy it is to get started with this great piece of software to create DEMs, orthomaps, and more. So the first thing you are going to want to do is start a new project. When you do this, a few different options will be available to you, however we are going to stick with the default ‘aerial’ choice here and name our project ‘Crops,’ and click next. From there, we are going to want to add images from our flight, and as you can see here, there are again some other various options to choose from. We have ‘near infrared’ and ‘RGB’ to pick from, so you will want to choose what would apply to you and would depend on which of our payloads you had flown with at the time. If you have captured near infrared images using our Tetracam payload, you’re going to want to choose that option, but for this video, we’re simply aligning and processing geo-tagged photos from one of our RGB camera payloads. Moving forward, we are going to go ahead and click ‘add images’ and navigate to the relevant folder that has the geo-tagged images from the last flight that we have saved. We’re going to select all and click open to choose our entire set of images. As you can see, all of our images have been selected, so we’ll go ahead and click next. From there, we have an overview of what the program had noticed about our images—it can tell us that there is geo-location data for 34 out of the 35 images that we have uploaded, and one image that, for whatever reason could not be geo-tagged. This program knows which camera model was used for capturing our images and has some information about that particular camera listed when it goes to process the photos for us—since Ricoh is displayed, we know the Zephyr 2 was used for this flight. You can see the one image that does not have the geo-tagged information listed can be selected that and excluded, but for the ones that do have the geo-tagging information listed, we can examine the latitude, longitude, and altitude for each image—confirming our EXIF data to be correctly uploaded to the program. Lining up these geo-tagged photos will be very simple for the program—again, the software can align photos without the information having been geo-tagged by using the image shadowing itself, however, data accuracy and time in processing will be less ideal vs using images with their geo-tagged information included. So to move forward processing our photos, we’re just going to click finish, and, ultimately, you will be able to preview your processed photos in Google Earth as well as using them to perform a variety of other functions. To learn more about using this program, I recommend reading through the PIX 4D software documentation that explains very well the process of going through and aligning photos to create point maps for orthomap generation and DEMs, as well as to export geo referenced image files to kml or geotif format. A link to the PIX 4D documentation is on this same page. If you have any questions, feel free to contact us through email or phone and we’d be happy to help! Thanks for watching and happy flying! |
||||||||||
|
http://www.youtube.com/watch?feature=player_embedded&v=OYWILqpDRqc
|


|
Multispectral Imaging Camera- Waypoint triggered, near infrared imaging camera for precision agriculture and crop prescription generation. X-axis stabilization. |
 |
|
|
Pan/Tilt Live Video Gimbal- Joystick controlled. Stream live video from your Marcus UAV groundstation in real time from up to 30 miles away. |
 |
|
| RGB Still Imaging Camera- Waypoint triggered camera for mapping and aerial survey purposes. X-axis stabilization |  |
|
 |
||
|
https://www.youtube.com/embed/haFHeYVOtwg
|
||
 |
||
|
https://www.youtube.com/embed/-zTRCROZn6w
|
||
| полет |
https://www.youtube.com/embed/JW2VrrdQWo8
|
|
 |
||
|
Video Tx and Rx
Radio Modem Pair For Telemetry Link
Radio modems are the communication link between your Ground Control Station and Unmanned Aerial Vehicle.
 2x Thunder Power 25C 14.8V 3900mah batteries- This is the set of batteries used in our Zephyr UAV’s
|
MEDIUM RANGE UAV TRACKING ANTENNATracking antenna is designed for high wind loading. Antenna tracking hardware includes, pan tilt setup, pan tilt controller set up and pre loaded, heavy duty tripod with quick release for easy transport. - 360 degree rotation. - Includes 8 dbi 900 Mhz and 14 dbi patch antennas.
SYSTEM INCLUDESLightweight black aluminum tripod
Heavy Duty Pan & Tilt Motor System
Ground control software
Technical support
(2) 8 Meter USB cables
8 Meter Audio/Video cable
option 1: 2.4Ghz 24 dbi parabolic grid dish antenna, 10 dbi 2.4Ghz Omnidirectional antenna & diversity video receiver, 900 Mhz 9 dbi yagi antenna & radio modem, cables, battery option 2: 5.8Ghz 27 dbi parabolic grid dish antenna, 12 dbi 5.8Ghz Omnidirectional antenna & diversity video receiver, 900 Mhz 8 dbi yagi antenna & radio modem, cables, battery SPECIFICATIONSAutonomously points antenna array at unmanned aircraft using telemetry data coming from the UAV
Up to 30 Mile range Line of Sight
360° pan, 90° Tilt, Autonomous tracking of unmanned aircraft
Supports antennas for both video and telemetry
Heavy duty tripod extends to 6 feet.
Quick release construction allows for expedient assembly and dissassembly without the need for tools.
Includes all cables necessary for operation
Optional encrypted digital data link
Includes control software
Operates from included 11.1V 5000 mah Lithium Ion Polymer battery

|


